Shela’s portrait

My domestic has been working for me for 8 years. She is 30 years old, with 2 children and runs my household like a professional! Not only is Shela a pleasure to have around, with a great sense of humour and a work ethic that is second to none, she is also quite beautiful. She has been watching my foray into art during the last year with a lot of interest. About 2 months ago she was standing in the studio (read: a corner of the study that my husband allows me some space to paint) looking at my latest endeavour when she said: “Mammi, you must paint me a picture.” “What would you like me to paint for you, Shela?” I asked, thinking that she’ll ask for a nature scene or maybe a painting of the ocean. “Me!” she exclaimed with a bright smile.

Well, I jumped at the opportunity to do a portrait. In fact, that was exactly what I had planned for my next project and Shela was the perfect model. We arranged for her to come through the next day, all dressed up for a photoshoot, and shot pictures of her in the garden, in the lounge on the couch, standing at the front door. She was brilliant! We finally chose a picture from the garden with her staring wistfully into the distance, face at ¾ angle to the camera. The light was great and I thought the picture made her look regal.

Original photo taken in the garden

I printed the photo on good quality paper and printed a black and white transparency as well. The canvas I used was 20 x 30 inches. I traced the picture onto the canvas with graphite using the transparency and overhead projector to ensure that the dimensions were correct. The next step was to get the first layer of paint on. I used a combination of Van Dyke Brown and Burnt Sienna to cover most of the face. At first I tried the Zelco brand, but the Burnt Sienna was too “runny” – almost watery – and it didn’t cover well. My teacher suggested the “Louvre” brand, which worked a lot better. During this layer, I focused on getting the light patches and dark shadows in so that the form of the face could take shape.

First layer in Burnt Sienna and Van Dyke Brown, lots of turps


After this layer dried (which it did within in a week) I filled in the irises in Van Dyke Brown surrounded by a black ring in Lamp Black. I also put another layer of Burnt Sienna and Van Dyke Brown onto the skin so that the canvas was covered well. Then I started on the clothes. I wanted to have quite a contrast between the skin (having a smooth texture) and the clothes, which I did very roughly. I used the red and blue from the photo, but didn’t blend it in at all, trying to get a rough finish where the brushstrokes could still be seen. I used colours that didn’t necessarily show up in the photo, like orange, purple and green, to create interest. The shadows and highlights were quite pronounced. I was very happy with the outcome and it went quite quickly.

Second layer over skin, clothes added

When this dried, I started on the background. A green would make a nice contrast and let the face stand out more. On second thought the green that I chose was a bit bright and started detracting from the portrait. Time to fix it later.

Background added - still wet!

The next step was to focus on the details of the face. I ensured that the skin was blended smoothly and focused on getting the shape of the nose right. With the many layers I had painted over the nostrils and it was imperative to get them right. The details are what makes a person look unique – the way that we recognise someone. I used a combination of Burnt Sienna and Flesh together with Van Dyke Brown. I found that the eyes and irises were too large (if you’re unsure, take a picture and look at the picture on your phone or camera. It usually shows the mistakes easier). I painted the eyes smaller and ensured that the irises were the correct size. The white of the eyes were done with a light grey, and I put in the shadow created by the eye lid. The pronounced shadows on the eyelid, under the eyes and next to the mouth, were done in Lamp Black and blended with Burnt Sienna. The lips were quite dark with a glint of pink. I used Van Dyke Brown and Naphtol Red, Titanium White and Burnt Sienna to get the pink shade right. Sometimes I also used Flesh to lighten the tint. The lips had to be blended quite well with a couple of layers to get it just right. The teeth were done in light grey (never white!) and the gap between the front teeth is a tiny black line. The highlights on the teeth were done with white. The highlights on the skin was also done with white, but blended very well into the rest of the tone. Where the white was too pronounced, I used Burnt Sienna to blend it in. The eyelashes and brows were done in Lamp Black, but when the brows looked too pronounced, I used Burnt Sienna to soften it. Also, be careful of not making the lashes too big or it will look unnatural. I painted a pupil in the eyes although it’s not visible in the photograph, but sometimes, for the sake of reality, you have to paint what’s not there. I also included Burnt Sienna in the irises to ensure that the eyes don’t look dead. Lastly, I added highlights to the eyes and that really brought them to life.

Highlights and shadows added, check the sparkle in the eyes!

Finally the mouth had to be finished. I took care to ensure that after the teeth were painted, the lines of the top- and bottom lips were painted over it. Otherwise it looks like the teeth are protruding from the mouth – not a pretty sight! The earring was done with Cadmium Yellow and grey with white to highlight the reflection. The background was re-done in a dirty green but still kept some of the light green from the first layer to give it depth and interest.

Shela's finished portrait

When I presented Shela with her portrait, she was stunned! Although I had shown her the progress (I was too excited to keep it to myself!) I don’t think she expected the finished portrait to be so beautiful. We will frame it with a simple wooden frame and she has assured me that it will have a place of honour in her house.

Very proud!

Pig cake for a 3-yr old


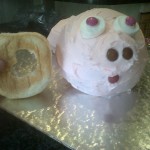
Piggy cake

I found this adorable cake in the Family Circle Cookery Collection – Fun Cakes for Special Occasions.  The cake was so cute that my son, Ryan (2) wanted me to make one for his third birthday.

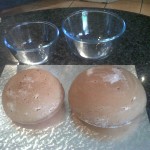
I baked a standard cake recipe and baked it in two Pirex bowls, one slightly bigger than the other. The bigger bowl would be the body and the smaller one the head. I coloured the dough pink for fun.

Fun Cakes for Special Occasions, Family Circle

I put the two cakes off centre on the cake board so that the pig stands diagonaly on the board.  I used butter icing which I coloured light pink and covered the bottom of the body so that it stuck onto the board.  Then I covered the top of the body.  The bottom of the head is also covered in pink icing and secured at an angle to the body.  It is then covered completely in pink icing.

Two round cakes


Pig snout from white bread

Next I had to make a pig snout.  I didn’t have cake to use, so I cut out a circle from white bread, covered it with icing and stuck it onto the pig.  Two brown Smarties competed the snout.  I cut one white marshmallow into two pieces with scissors, and stuck onto the cake.  Two pink Smarties competed the eyes.  A red Smartie made a small mouth at the bottom.

I fashioned a tail and two big pig’s ears from pink sugarpaste (with a little CMC glue in to make it stronger).  The tail was inserted onto the “bum” of the pig.  I had to leave the ears overnight to dry an harden.  Four marshmallows created legs for the pig.  I used white because I ran out of pink but pink would be better.

Pig with ears and legs


Next, I coloured the icing green and spread it around the pig to suggest grass. With a nozzle I created some grass around the pig.

Pipe grass in spots around the pig

The difference between men and women

I have just finished a book called “Self Made Man” by Norah Vincent.  This was a fascinating read about a women’s quest to see what it’s like to experience life as a man.  She spent a year disguised as a man in order to learn more about what it’s like being a man in the western world.

I love books about social experiments (another favourite was Danny Wallace’s “Join Me” www.join-me.co.uk  where he got hundreds of people joining him for no reason whatsoever!)

Norah Vincent wanted to get into the male psyche and immerse herself in the world where men rule supreme.  She was expecting to experience the sense of power that comes from being an alpha male, having access to opportunities without having to apologise, and strutting around without fear.  Although her insights after the year include the amazing feeling of belonging that she experienced as a member of a male group of friends (she joined a bowling league) the overall experience of being a man was quite different from her expectations.

She basically realised that most men live a life filled with fear and pain!  Fear, because they are constantly scrutinised by themselves and others for any sign of weakness.  This could take the form of emotional weakness (showing sadness or compassion) or physical weakness (being unable to throw a bowling ball, for example.)  Weakness in a man (as opposed to vulnerability in women) does not engender sympathy from other men.  It makes them feel embarrassed for you and sometimes even lead to vicious attacks – whether verbal or physical.  It seems that, as a man, you have to be on top of your game all the time.  You cannot be sad, emotional or just not good at something.  The culture doesn’t tolerate it.

Most men live in pain because they’ve been taught – no, forced – not to show emotion.  Boys don’t cry, remember?  Even young boys are taught that they have to show no emotion when they are in pain, and with enough time, they unlearn the skill of talking and sharing their emotions.  The effect is that most grown men are unable to “feel” emotion in any true sense.  This has the result of imprisoning them in a cold and lonely state where the only emotion they can share without fear of being ostracised, is anger.  And, according to Norah, there is a LOT of angry men out there.

Wow.  This really scared me.  As a woman, I am used to having good cry when I feel the need to.  I can show love and affection to my husband and children (two boys) without fear of being rejected or seen as a “sissy”.  Even my relationships with other women is characterised through physical touch (hugs and kisses) as well as sharing our most intimate feelings easily.  In fact, the thought of not giving outing to my feelings is a frightening one.  What do you do with all those bottled-up emotions if you don’t have the cultural option of letting them out?!

I worry about how I will raise my boys in this cultural paradigm.  I want them to be happy – any mother does – but I also want them to fit in.  The two are closely related, aren’t they?  But the dichotomy is that they also seem to be mutually exclusive.  You can only be happy in yourself if you have a healthy emotional life.  That means feeling and showing emotions freely.  But in a culture that frowns on any show of vulnerability in men, it means that you’ll have to curb those emotions that are “unacceptable” – leading to unhappiness.  Part of the same equation is fitting in with what the group expects from you.   We’ve all experienced the pain of being in a group where we don’t fit in.  So, how are you a healthy emotional human being but also fit in with the male culture where the only emotion that carries any value is anger?  A true catch 22.

I don’t have the answer.  I try to ensure that my children (5 and 2 respectively) are in touch with their emotions.  When they cry, I ask them why they are sad.  I try to convey the message that it is ok to cry when you are in pain – either physical or emotional.  I try not to tell them that I’m proud of them for not crying – something that is surprisingly difficult!  I took my 5 year old to the doctor the other day for a painful spider bite.  Afterwards I was horrified to hear myself telling him that I’m proud of him for not crying!  It just showed me how deep the “boys don’t cry” belief goes in my own paradigm.  In future I will tell him that I’m proud of him for showing emotion in an honest way.

If we are going to change the paradigm that showing male emotion is ok, we have to start with our children.  Show them that emotions are acceptable, whether it is mad, sad, glad or bad!  Talk about feelings and encourage them to really feel.  More importantly, encourage the male role models in their lives to show it too.  My husband is brilliant at that.  He shows his boys that it’s acceptable to hug and kiss, and he holds them tightly when they cry.  It warms my heart every time I see it.  That’s how you change the world.

Anyone can paint

I’ve always wanted to be an artist. I’ve often imagined hosting a fancy dinner and a guest pointing admiringly to a masterpiece on the wall asking who the artist is. I would then (modestly) confess that it’s me… :-) This became a reality this year.

Old woman with cigarette, graphite on paper

I’ve never been able to draw. This is what I was told in primary school, when the apple I drew in art class more resembled a red baseball than a fruit. The art teacher patiently explained that an apple is not round and that was the first time that I realised that the appearance of things wasn’t actually what I thought it was. It took me another 34 years to muster up the courage to try my hand at another apple. At the end of last year I was stuck at home for the holidays with 2 boys under the age of 5. It was great spending some time with my kids, but towards the end I thought I was going out of my mind. I just needed something new and creative to allow me to feel human again. So, I borrowed my sister’s book “Drawing on the Right Side of the Brain” by Dr Bettie Edwards. I painstakingly did all the exercises in the book and was actually quite surprised at what I managed to achieve. Instead of thinking about how something should look and then trying to draw it (which is nigh impossible), I really looked at an object and drew what I saw. The outcome was rather amazing.  I drew the likeness of an old woman holding a cigarette in her mouth.

Protea in ink, charcoal and chalk

Encouraged by early success I then set out to find an art teacher. I found a studio close to home that offered classes on Tuesday evenings, covering a variety of mediums. On the first evening the art teacher, Isa, set us up with charcoal and chalk and told us to choose a picture from a magazine and draw that. The result overwhelmed me so much that I seriously thought of framing it!

I tried to learn what I could from both the teacher and the classmates and had a thoroughly good time. We learned how to draw without stylizing (that is drawing what you THINK it should look like instead of drawing what it ACTUALLY LOOKS like!) and although I still struggled every now and then, I found myself improving. A couple of months later I created an oil painting over a photo printed on canvas. This I did frame and it’s hanging in my corridor. It’s one of my favourites.

Photo printed on canvas, oil

But I felt frustrated. I wanted to work with oil paint and the classes were focused on exposing students to various mediums. I dropped out and bought a book called “Oil Painting for Dummies”. Sounds like it could teach me a couple of things, right? It did! It covered the basics around materials, mixing colours and creating a picture. Again I didn’t cut corners. I did all the exercises – still lives of vegetables, cans and bottles. I tried different techniques and brushes. I painted from life and from photo’s. Some paintings came out better than others, but I learned something with every effort.

Still life of vegetables, oil on canvas paper

Again, I found myself frustrated. After I worked through the book, I had even more questions. I set out to find another art teacher, one specialising in oil painting. The one I found (Carien du Preez from www.paintitblack.co.za) specialises in creating realistic paintings in oils and acrylics. I started weekly classes with her. First I chose a landscape because I’ve always wanted to do landscape. It wasn’t my favourite picture in the world, but again I learned about painting in layers and using the contrasts in the painting to your advantage. The result was given as a Christmas present to my mother. She professes to love it!

Kirstenbosch aloes, oil on canvas

All throughout this, I would check out painting tutorials on YouTube, read articles on About.com about painting and practise, practise, practise! After the landscape scene, I wanted to do a still life. I found a beautiful photo and Carien and I started working. I did cheat a bit – I traced the picture onto the canvas from a projector to keep the perspective and the proportions correct. For me it’s the outcome that matters and not so much the journey there. Is that wrong? The still life came out beautifully! My best work yet. I was overjoyed that I managed to create something so awesome!

Still life with jug, bottles and glasses, oil on canvas


It has been framed and hangs in my dining room, just waiting for that dinner guest to point out how beautiful it is. What have I learnt from the experience? Anyone can paint. If you can hold a pen with enough dexterity to sign your name, you can create a masterpiece. Sure, I won’t be the next Van Gogh or Picasso, but I don’t have to be. The satisfaction of creating something that is beautiful and can be admired is exhilarating. It does take time and effort, but if you are focused on the outcome and willing to put in the work, it will happen. My next goal is to actually “sell” a painting!

Keep on checking my blog for updated pictures of my art work.

Sienna Miller and I…


Sienna Miller and I have the same stylist. Are you impressed? So was I!

It happened like this… On my way home from holiday on the 30th of Dec 2011, I received a call from Peter from Woolworths. Great news, he said. I won a competition through Little World, the club for mommies at Woolies. You can understand my initial scepticism – I had won millions in the UK Lottery before (without buying a ticket), so I was understandably taking it with a pinch of salt. But it was legit. I won a “Mommy Make-over” competition through Woolies’ Little World. It included a full afternoon with a stylist who would do my hair and make-up and then take me shopping with the R3,000 voucher included in the prize. I was overjoyed. It sounded like a LOT of fun. 

Fabienne inserting some curls

And so it was that on the 17th of Jan 2012 I made my way over to the Melrose Arch Woolworths to present myself to staff and stylist. The shop, which I had never been to before, is beautiful. It’s quiet, with a great selection of everything Woolies has to offer in the area of drop-dead style. I was met by the Beauty Manager, Angie and taken to


 a private room where the make-over would happen. I met the stylist, Fabienne Zadel, (www.fabienne.co.za ), a small French woman with striking eyes and a long salt ‘n pepper braid tied with a bow. She greeted me warmly and I could see her professional glance taking in my complete appearance. I was glad that I dressed fairly nicely (I thought so,


anyway) because I wanted her to see what my current style was like. There’s always something to improve on, right?

Making small talk, I asked her what she’d been busy with the previous day. Oh, she said, working on a movie shoot in Cape Town with Sienna Miller. Gulp! As we chatted, she mentioned the international stars that she has worked with – Charlize Theron, Ryan Reynolds, Jeff Bridges, Denzel Washington. Ok, I was impres


sed! Fabienne washed my face and started on my hair. She blow-dried it and added a couple of curls. Then she had me bend over and went wild with the hairspray. When I came upright again, I had a hairdo like Marilyn Monroe! Wow, this woman was a genius.

Like, wow!

Onto the make-up next. Fabienne told me that the foundation I use is too pink. I always thought that, being quite pale, I had to choose a foundation that would bring a bit of colour to my face. Not a good idea, evidently. She used a foundation with a more yellow tint, which had the effect of creating a pale canvas onto which the make-up could be applied (Smashbox Studio Skin). I must admit that it looked a lot better. She told me that the main mistake I had been making with my usual make-up was to go too dark on my lips and too light on my eyes. As we grow older, Fabienne said, dark lipstick tends to make us look harsh. Leave it for the evenings only. She encircled my eyes with a dark copper liner (complimenting the green of my eyes) and used a dark brown (Lancome Black Cuivre – 244) to cover most of the eyelid. She used a lighter colour on the bank of the eye to highlight it (Woolworths Apricot Frost). Next, she used black mascara to frame the eyes. She insisted that I MUST wear blusher applied lightly on the apple of the cheek. Evidently Charlize wears it like that. Ok. On my lips she used Smashbox Lip Tech Peony with Smaxhbox lipgloss “Afterglow”. When she finally let me look in the mirror I was blown away! Who knew I could look like a movie star?

Very funky

The next step was spending some voucher money! Fabienne went for a funky look for me. She chose bright colour for the pants like melon (a type of orange, I thought) coupled with a crisp white shirt and a scarf which mirrored the melon colour of the pants. She plunked a hat on my head which had the effect of making me look playful and – yes – funky! High heels completed the ensemble.

A little violet number

Next, I tried on a dark violet dress with black lace around the neckline. A golden scarf and nude high heels created an interesting contrast and made the fancy little number a bit more mischievous. (insert photo) A bright pink dress with killer black heels and pink clutch bag had me looking ready for a board meeting while emphasising the femininity of the look. (insert photo) All throughout the Woolies staff was ooh-ing and aah-ing and taking pictures to upload onto the website (insert Flicr stream). Everyone was extremely friendly and very willing to please. I FELT like Sienna Miller for an afternoon.

Shopping, shopping

The next day I managed to copy the hairstyle and the make-up from the day before and with my melon outfit and spiky heels, dropped my son off at school. My friends, standing around outside the classroom, ignored me at first – because they didn’t recognise me! The looks of amazement on their faces were precious! They were so impressed with the transformation that they asked for Fabienne’s details in order to book her. Evidently she can do this for groups. Only problem is, now they’re all going to look as fabulous as me! There goes my competitive advantage! LOL :-)

What I learned from the experience: Don’t be afraid to change. There’s always room for improvement. Don’t be afraid to use colour – both on your face and in your outfits. Match different things together (violet and gold, for example) and don’t be afraid to experiment. Thanks Fabienne and Woolworths! You’re the best.